MethodicConfigurator
Development guide
The goal ArduPilot methodic Configurator software is to automate some of the tasks involved in configuring and tuning ArduPilot-based vehicles. To develop the software the standard V-Model software development method was first used. It was augmented with DevOps and CI/CD automation practices at a later stage.
V-model
Development started by using the classic V-model development methodology.
flowchart TB
    subgraph requirements["Requirements & Design"]
        direction LR
        Z([User Requirements]) --> A
        A([System Requirements]) --> B([Software Architecture])
        B --> C([Module Design])
    end

    subgraph testing["Testing"]
        direction LR
        F --> G([Acceptance Testing])
        E --> F([System Testing])
        D([Module Testing]) --> E([Integration Testing])
    end

    %% V-shape connections (crossing levels)
    Z --> G
    A --> F
    B --> E
    C --> D

    %% Clickable links
    click A "SYSTEM_REQUIREMENTS.md"
    click B "#the-software-architecture"
    click C "#module-design"
    click D "#module-testing"
    click E "#integration-testing"
    click F "#system-testing"
    click G "#acceptance-testing"

    %% Styling
    classDef requirement fill:#e1f5fe,stroke:#01579b,stroke-width:2px
    classDef design fill:#f3e5f5,stroke:#4a148c,stroke-width:2px
    classDef testing fill:#e8f5e8,stroke:#1b5e20,stroke-width:2px

    class A,Z requirement
    class B,C design
    class D,E,F,G testing
If the diagram above does not display correctly, see here
The Software architecture
We decided to use python as programming language, and the following libraries and frameworks:
- pymavlink for the flight controller communication
- tkinter for the graphical user interface
- GNU gettext
pofiles to translate the software to other languages
The (main) application itself does the command line parsing and starts the sub-applications defined below in sequence
To satisfy the system design requirements the following user interface sub-applications were developed:
Sub-Application Architecture Documentation
Each sub-application has detailed architecture documentation covering requirements, implementation status, data flow, components, testing, and recommendations:
- Software Update Check - Checks for and downloads software updates
- Flight Controller Communication - Establishes FC connection, downloads parameters and metadata
frontend_tkinter_connection_selection.pyfrontend_tkinter_flightcontroller_info.pybackend_flightcontroller.py- Main facade class using delegation patternbackend_flightcontroller_connection.py- Connection managementbackend_flightcontroller_params.py- Parameter operationsbackend_flightcontroller_commands.py- Command executionbackend_flightcontroller_files.py- File operationsdata_model_flightcontroller_info.py- FC informationbackend_flightcontroller_protocols.py- Protocol definitions
backend_mavftp.py
- Directory and Project Selection - Creates new projects or opens existing ones
- Vehicle Component Editor - Defines vehicle components and their FC connections
- Parameter Editor and Uploader - Views documentation, edits parameters, uploads to FC
- sequentially for each configuration step:
- view documentation relevant for the current configuration step,
- edit parameters relevant for the current configuration step,
- upload them to the flight controller,
- save them to file
frontend_tkinter_parameter_editor.py
- sequentially for each configuration step:
- Motor Test - Provides motor testing functionality with visual diagram display
Each sub-application can be run in isolation, so it is easier to test and develop them.
Data Models and Architecture
Each application separates the business logic (data_model_*.py) from the user interface logic (frontend_tkinter_*.py).
This improves testability and maintainability of the code.
- Check for software updates:
- FC connection:
data_model_fc_ids.py<- autogenerated byupdate_flight_controller_ids.py
- Create or open project:
- Component editor:
battery_cell_voltages.pydata_model_vehicle_components_base.pydata_model_vehicle_components_display.pydata_model_vehicle_components_import.pydata_model_vehicle_components_json_schema.pydata_model_vehicle_components_templates.pydata_model_vehicle_components_validation.pydata_model_vehicle_components.py
- Parameter editor:
The detailed data models, components, and dependencies for each sub-application are documented in their respective architecture files linked above.
Common Libraries and Shared Components
All applications use one or more of the following shared libraries:
- internationalization
__init__.pyinternationalization.pyconfiguration_steps_strings.py<- autogenerated byupdate_configuration_steps_translation.pyvehicle_components.py<- autogenerated byupdate_vehicle_components_translation.py
- command line parsing
- the local filesystem backend does file I/O on the local file system. Operates mostly on parameter files and metadata/documentation files
- the internet backend communicates with the internet
- the flight controller backend communicates with the flight controller using a delegation pattern with specialized managers:
backend_flightcontroller.py- Main facade class that delegates to specialized managersbackend_flightcontroller_connection.py- Handles connection establishment, port discovery, and heartbeat detectionbackend_flightcontroller_params.py- Manages parameter download, upload, and queryingbackend_flightcontroller_commands.py- Executes MAVLink commands (motor tests, battery status, etc.)backend_flightcontroller_files.py- Handles file upload/download via MAVFTPdata_model_flightcontroller_info.py- Stores flight controller metadata and capabilitiesbackend_flightcontroller_protocols.py- Protocol definitions for dependency injection and testingbackend_mavftp.py- MAVFTP protocol implementation
Flight Controller Backend Architecture:
- The
FlightControllerclass acts as a facade, delegating operations to specialized managers - Each manager handles a specific concern (connection, parameters, commands, files)
- Managers can reference each other (e.g., params manager holds reference to connection manager)
- Protocol definitions enable dependency injection for testing
- Connection manager is the source of truth for connection state (
master,comport,info) - Other managers query connection manager for current state rather than caching it
Error Handling Standards:
To maintain consistency across the flight controller backend, the following error handling patterns are used:
- Connection and I/O Operations - Return
str(empty string on success, error message on failure):connect(),disconnect(),register_and_try_connect()- Rationale: Allows user-friendly error messages to be displayed directly
- Command Operations - Return
tuple[bool, str](success flag, error message):test_motor(),test_all_motors(),reset_all_parameters_to_default()- Rationale: Separates success/failure from error details for better control flow
- Query Operations - Return
Optional[T]or raise exceptions:fetch_param()- raisesTimeoutErroron timeoutget_battery_status()- returnstuple[Optional[tuple[float, float]], str]- Rationale: Distinguishes between “not found” (None) and “error” (exception)
- Bulk Operations - Return data structures or tuples:
download_params()- returnstuple[dict[str, float], ParDict]- Rationale: Success implied by returned data, errors logged but not returned
Testing Hacks and Violations:
The following methods exist for testing purposes only and violate architectural principles:
-
FlightController.set_master_for_testing()- Directly mutates connection manager’s internal state, violating the principle that connection manager should be the sole mutator of connection state. Never use in production code. -
Test parameter loading via
device=DEVICE_FC_PARAM_FROM_FILEinbackend_flightcontroller_params.py- Bypasses normal parameter download flow to load from local file.
- the tkinter frontend, which is the GUI the user interacts with
frontend_tkinter_autoresize_combobox.pyfrontend_tkinter_base_window.pyfrontend_tkinter_entry_dynamic.pyfrontend_tkinter_pair_tuple_combobox.pyfrontend_tkinter_progress_window.pyfrontend_tkinter_rich_text.pyfrontend_tkinter_scroll_frame.pyfrontend_tkinter_show.pyfrontend_tkinter_usage_popup_window.py
When all is combined it looks like this:
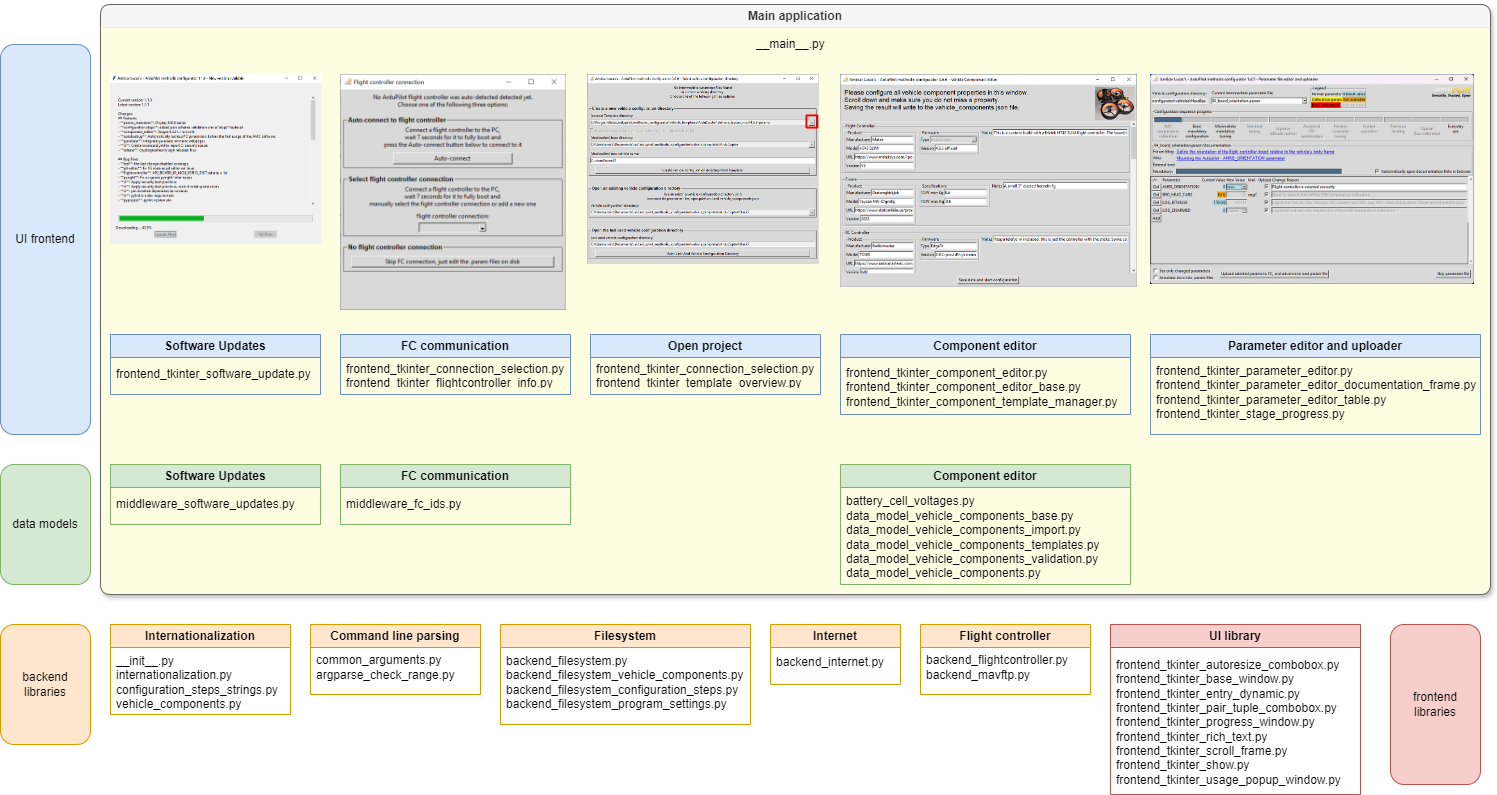
The parts can be individually tested, and do have unit tests. They can also be exchanged, for instance, tkinter-frontend can be replaced with wxWidgets or pyQt.
In the future, we might port the entire application into a client-based web application. That way the users would not need to install the software and will always use the latest version.
Generated Files
Several files in the project are automatically generated and should not be manually edited:
Core Application Generated Files
data_model_fc_ids.py<- autogenerated byupdate_flight_controller_ids.py- Contains flight controller hardware identification mappings
- Generated from ArduPilot firmware metadata
configuration_steps_strings.py<- autogenerated byupdate_configuration_steps_translation.py- Contains translatable strings for configuration step descriptions
- Generated from configuration JSON files for internationalization
vehicle_components.py<- autogenerated byupdate_vehicle_components_translation.py- Contains translatable strings for vehicle component descriptions
- Generated from vehicle component JSON schemas for internationalization
Development and Analysis Tools
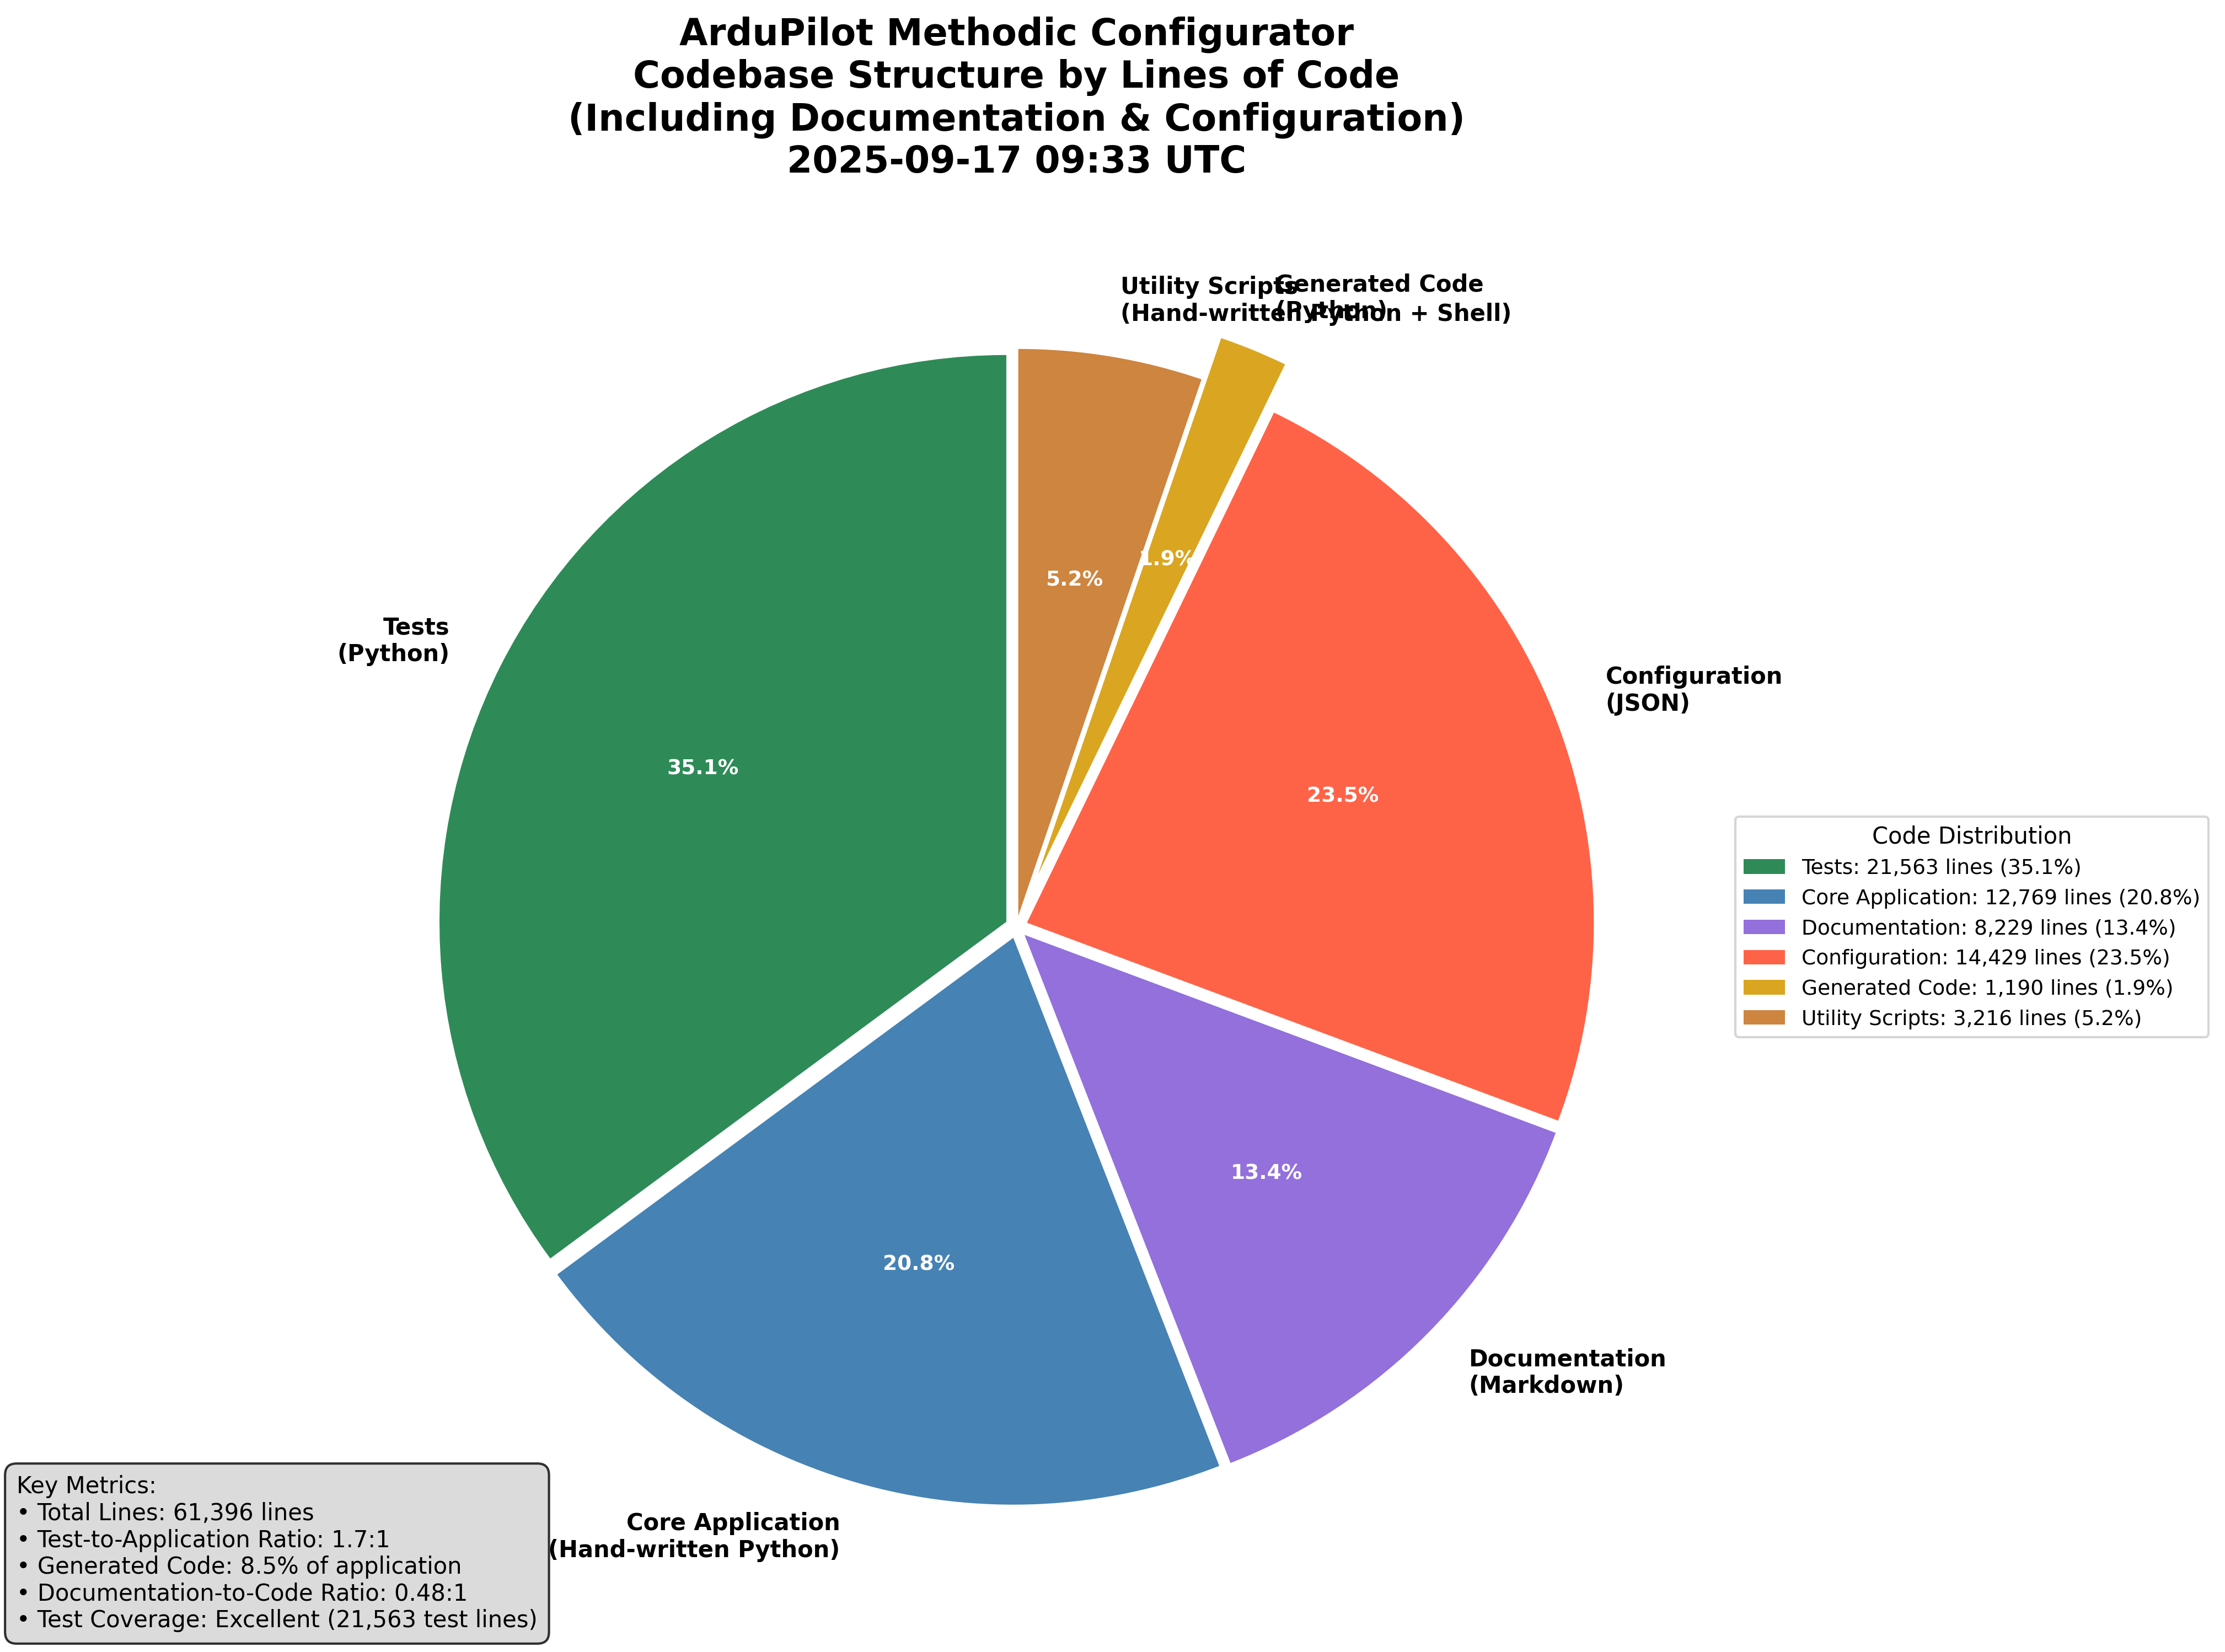
generate_codebase_pie_chart.py<- generated by AI assistant for codebase analysis- Creates pie chart visualizations of codebase structure
- Automatically maintains codebase metrics and statistics
- Part of the development workflow for project health assessment
download_motor_diagrams.py<- autogenerated by.github/skills/update-motor-diagrams/SKILL.md- Downloads motor diagram SVG files from ArduPilot documentation
- Updates motor diagrams used in the motor test sub-application
- Periodically updated via GitHub Actions workflow
Note: When calculating code metrics or performing codebase analysis, these generated files should be counted separately from hand-written code to provide accurate development statistics.
Module design
To assure code quality we decided to use Microsoft VS code with a lot of extensions to lint the code as you type. We use git pre-commit hooks to check the code before it is committed to the repository.
Module testing
We tested using automated static tests in both pre-commit hooks and on github CI:
- ruff
- pylint
- mypy
- pyright
- markdown-lint
- markdown-link-check
- codespell, grammarly
- shellcheck
We tested using automated dynamic tests on github CI including automated test coverage reports.
We use unittest to write unit tests for the code.
The tests are easy to run on the command line or in VS code.
When you write new code you must also write tests in the tests/ directory, there is CI test that only passes if test coverage increases monotonically.
To run the tests either use the python tests plugin in visualstudio code, or execute:
pytest
Integration testing
The different sub-applications are first tested independently. Each has detailed testing strategies documented in their respective architecture files:
- Software Update -
python .\ardupilot_methodic_configurator\data_model_software_updates.py - Flight Controller Communication -
python .\ardupilot_methodic_configurator\frontend_tkinter_connection_selection.py - Directory Selection
python .\ardupilot_methodic_configurator\frontend_tkinter_directory_selection.pypython .\ardupilot_methodic_configurator\frontend_tkinter_template_overview.py
- Component Editor -
python .\ardupilot_methodic_configurator\frontend_tkinter_component_editor.py - Parameter Editor -
python .\ardupilot_methodic_configurator\frontend_tkinter_parameter_editor.py - Motor Test -
python .\ardupilot_methodic_configurator\frontend_tkinter_motor_test.py
Only after each one performs 100% as expected, they are integrated and tested together. This speeds up the development process.
System testing
Here the integrated application was tested against the system requirements defined above. The tests were conducted on Windows and Linux machines using multiple different flight controllers and firmware versions. The software is automatically build and distributed using the github CD pipeline.
Acceptance testing
The software was tested by multiple users with different skill levels, languages, flight controller and backgrounds. The feedback was used to improve the user interface and user experience. The software is ready for production use since November 2024.
DevOps
The software is feature complete and stable with a user base of hundreds of users, we switched from the V-Model to DevOps development process on November 2024. This provides faster response to requirements changes and additions.
Do a release
The release process is automated.
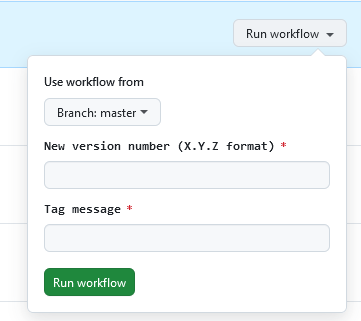
To do a release navigate to the bump_version_and_tag workflow
and select Run Workflow enter the version and the description and press the green Run Workflow button.