MethodicConfigurator
Ardupilot Methodic Configurator use cases
The software is meant to guide you a in sequence of procedural steps to configure and tune your vehicle in a safe and time-efficient way.
Hence the two main use cases are:
- Use the ArduPilot Methodic Configurator software for the first time
to create a vehicle configuration based on a pre-existing template
- Use the ArduPilot Methodic Configurator software after having created a vehicle from a template to edit existing vehicle configuration files to configure and tune a vehicle
But there are other use cases as well:
- Create a vehicle project from a .bin log file
- Create a vehicle configuration based on a correctly configured vehicle
- Review and or edit configuration files without having the vehicle FC
- Use the correct default values
- Re-run the procedure after changing a vehicle component
Use the ArduPilot Methodic Configurator software for the first time
It is recommended to start with default parameter values on your flight controller as it guarantees that all parameters have sane values and provides a clean baseline for the configuration process. This is especially important for new vehicles or when you’ve made significant changes to your setup.
If your vehicle is already operating correctly and you’re just making minor adjustments, you do not need to reset the parameters to their default values as this would require reconfiguring everything from scratch.
- Close all other GCS software (MissionPlanner, QGroundControl, MAVProxy, DroneKit-Python, APM Planner 2.0, UgCS, LOGOS, Tower, AndroPilot, etc). The ArduPilot Methodic Configurator needs connection exclusivity.
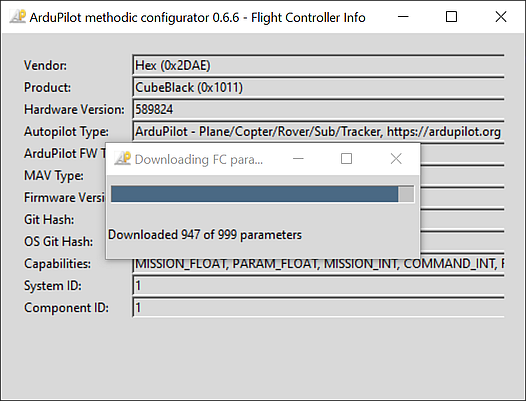
- Connect the flight controller to the computer using a USB cable.
- Wait at least 7 seconds.
- Open the ArduPilot Methodic Configurator software.
- The software should now automatically detect and connect to your flight controller.
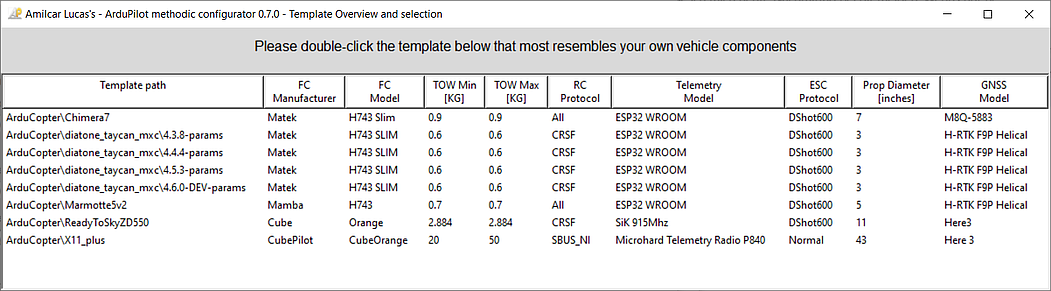
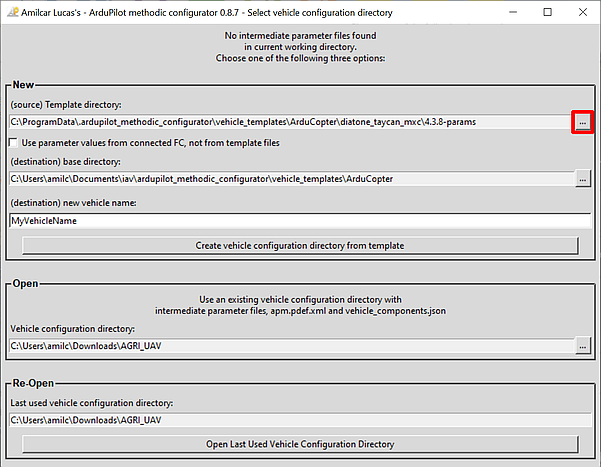
- Press the Create a vehicle configuration directory from template button.
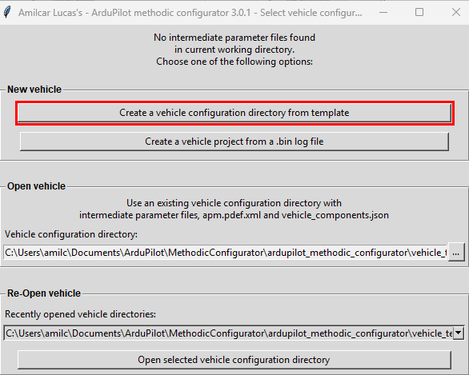
- Select source template directory to use.
- Select the vehicle template that better resembles your vehicle, it does not need to fully match your vehicle.
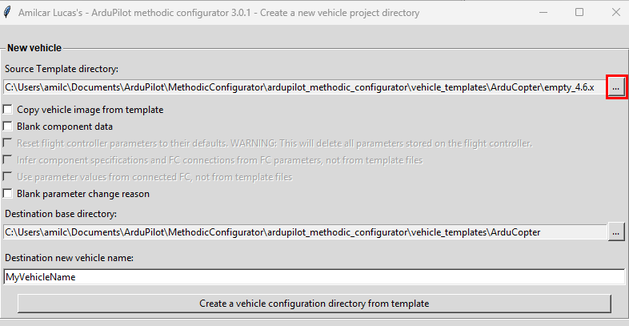
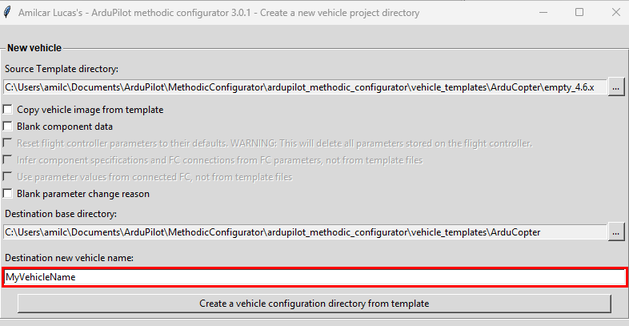
- Select the options that meet your requirements:
- Copy vehicle image from template - Use the template vehicle image in your created vehicle configuration directory. This image helps identify the vehicle configuration.
- Blank component data - Create a new blank vehicle configuration, with no component data from the template.
- Reset flight controller parameters to their defaults - Reset the flight controller parameters to their default values when creating a new vehicle configuration. Helps avoid issues caused by incorrect or incompatible parameter settings. WARNING: This will delete all parameters stored on the flight controller.
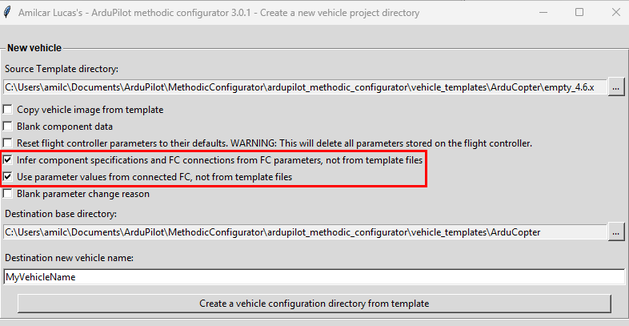
- Infer component specifications and FC connections from FC parameters, not from template files - When creating a new vehicle configuration, extract component specifications and connection information directly from the connected flight controller instead of using the specifications defined in the template files. This helps ensure the configuration accurately matches your actual hardware. Note: you will not see the information from the correctly configured vehicle template. This option is only available when a flight controller is connected.
- Use parameter values from connected FC, not from template files - Use the parameter values from the connected flight controller instead of the template files when creating a new vehicle configuration directory from a template. Only makes sense if your FC has already been correctly configured. This option is only available when a flight controller is connected.
- Blank parameter change reason - Do not use the parameters change reason from the template.
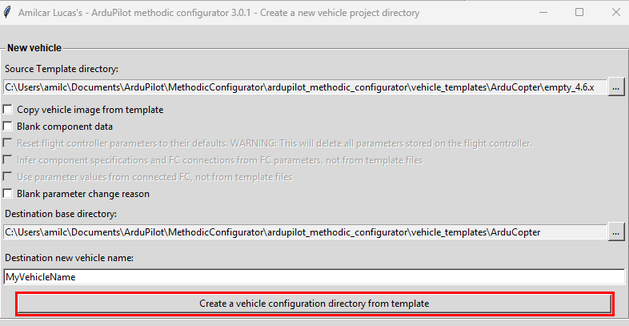
- Give a name to your vehicle.
- Press Create a vehicle configuration directory from template.
- Edit all the components of your vehicle to match your own in the Vehicle Component Editor window.
Please scroll down and make sure you do not miss a property.
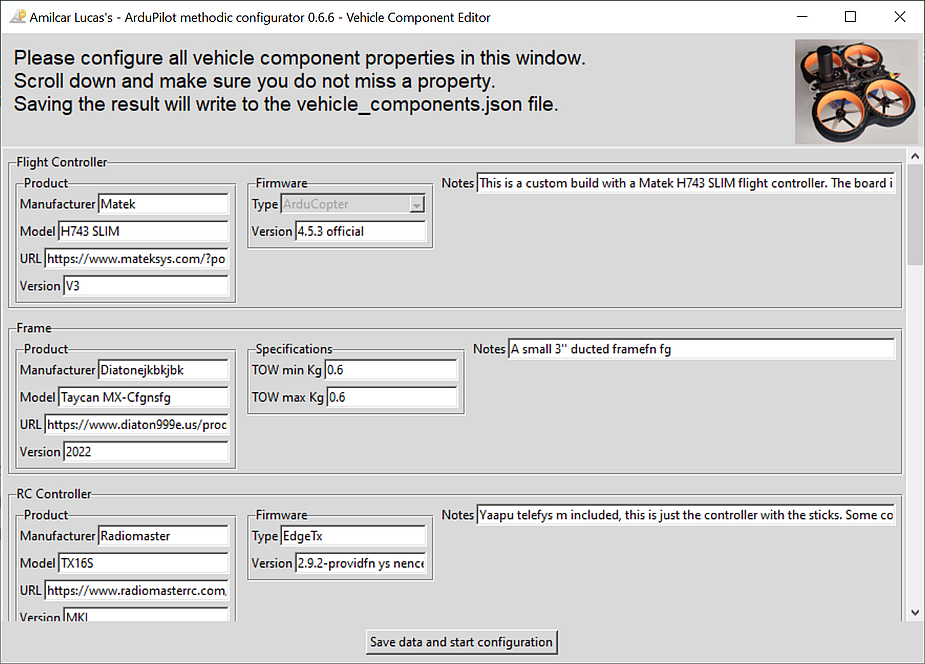
- Press Save data and start configuration.
- The application will validate your input.
If issues are found the problematic fields’ background will be marked in red color.
Correct those entries and press the
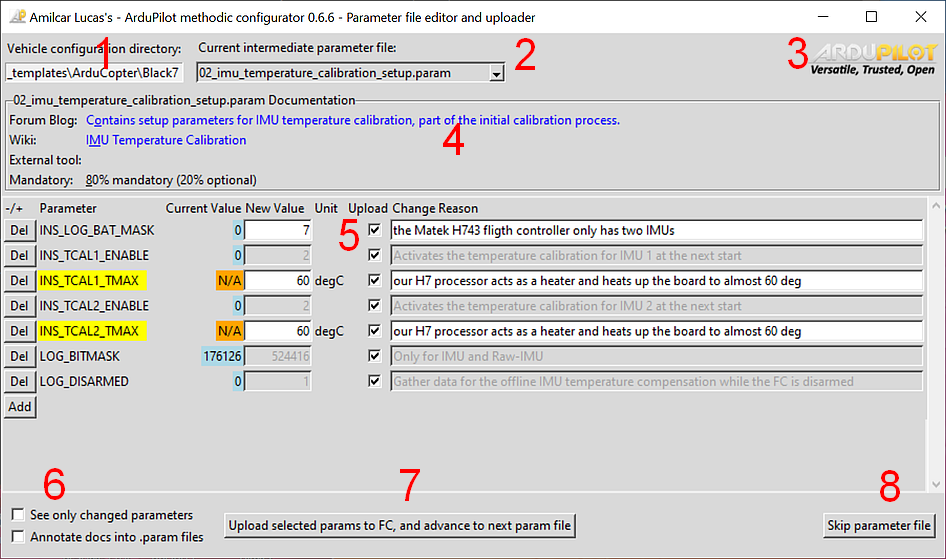
Save data and start configurationbutton again. - You should now see the Parameter file editor and uploader window.
If something is not clear, read the ArduPilot Methodic Configurator user manual
Use the ArduPilot Methodic Configurator software after having created a vehicle from a template
- Close all other GCS software (MissionPlanner, QGroundControl, MAVProxy, DroneKit-Python, APM Planner 2.0, UgCS, LOGOS, Tower, AndroPilot, etc). The ArduPilot Methodic Configurator needs connection exclusivity.
- Connect the flight controller to the computer using a USB cable.
- Wait at least 7 seconds.
- Open the ArduPilot Methodic Configurator software.
- The software should now automatically detect and connect to your flight controller.
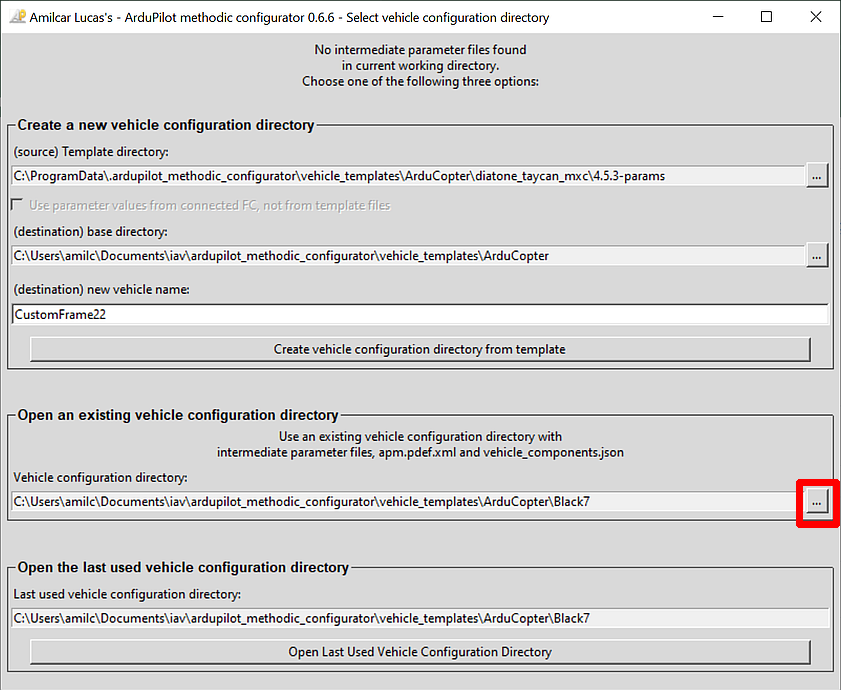
- Open the vehicle configuration directory that you created in the Use the ArduPilot Methodic Configurator software for the first time.
double-click and step inside the directory that you want to use, not just select it.
- Edit all the components of your vehicle to match your own.
Please scroll down and make sure you do not miss a property.
- Press Save data and start configuration.
- You should now see the Parameter file editor and uploader window.
- Proceed as explained in parameter editor workflow overview
If something is not clear, read the ArduPilot Methodic Configurator user manual
Create a vehicle project from a .bin log file
Use this workflow when you have an ArduPilot .bin flight-log file recorded by a vehicle that was already
running a valid configuration and you want to reconstruct a methodic-configurator project from it —
no physical flight controller required.
The software reads the .bin file to automatically determine:
- Vehicle type (e.g. ArduCopter, ArduPlane, Rover) from the log’s
VERorMSGrecord - Firmware version (major.minor.patch) from the same record — used to select the right
parameter-documentation metadata and to populate
vehicle_components.json - Default parameter values — the per-build defaults stored in the log (
PARMmessages withDefaultattribute) - Current parameter values — the values that were actually active when the log was recorded
- Open the ArduPilot Methodic Configurator software.
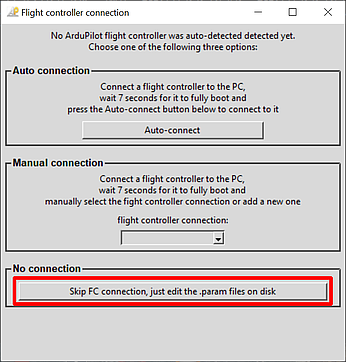
- Select
Skip FC connection, just edit .param files on diskbutton.
- Click the Create a vehicle project from a .bin log file button.
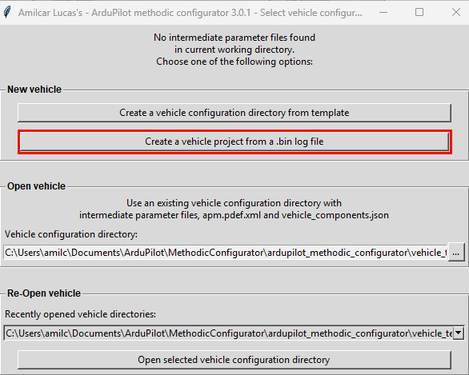
- In the file-picker that opens, select your
.binlog file.- The software automatically detects the vehicle type and firmware version.
- A matching template directory (e.g.
ArduCopter/empty_4.6.x) is selected automatically. - The project is named after the log file (without the
.binextension) and created in the default vehicles directory. 00_default.paramis populated with the default values extracted from the log.- A
xx_imported_bin_log_parameters.paramfile is created for any current values that differ from the template’s parameter files — giving you a clear delta to review and tune. vehicle_components.jsonis updated with the detected firmware type and version.
-
Review and edit the vehicle components in the Vehicle Component Editor window. The firmware type and version fields will already be pre-filled from the log.
- Press Save data and start configuration.
- You should now see the Parameter file editor and uploader window.
- Follow the procedure to configure the vehicle parameters.
If something is not clear, read the ArduPilot Methodic Configurator user manual
Create a vehicle configuration based on a correctly configured vehicle
- Connect the flight controller to the computer using a USB cable.
- Wait at least 7 seconds.
- Open the ArduPilot Methodic Configurator software.
- The software should now automatically detect and connect to your flight controller.
- Press the Create a vehicle configuration directory from template button.
- Select the vehicle template that better resembles your vehicle.
- select the
Infer component specifications and FC connections from FC Parameters, not from template filesand theUse parameter values from connected FC, not from template filescheckboxes- Infer component specifications and FC connections from FC parameters, not from template files - When creating a new vehicle configuration, extract component specifications and connection information directly from the connected flight controller instead of using the specifications defined in the template files. This helps ensure the configuration accurately matches your actual hardware. Note: you will not see the information from the correctly configured vehicle template. This option is only available when a flight controller is connected.
- Use parameter values from connected FC, not from template files - Use the parameter values from the connected flight controller instead of
the template files when creating a new vehicle configuration directory from a template.
Only makes sense if your FC has already been correctly configured. This option is only available when a flight controller is connected.
- Give a name to your vehicle.

- Press Create a vehicle configuration directory from template.

- Edit all the components of your vehicle to match your own in the Vehicle Component Editor window.
- Press Save data and start configuration.
- The application will validate your input.
If issues are found the problematic fields’ background will be marked in red color.
Correct those entries and press the
Save data and start configurationbutton again. - You should now see the Parameter file editor and uploader window.
- Follow the procedure to configure the vehicle parameters
If something is not clear, read the ArduPilot Methodic Configurator user manual
Review and or edit configuration files without having the vehicle FC
- Open the ArduPilot Methodic Configurator software.
- Select
Skip FC connection, just edit .param files on diskbutton.
- Open the vehicle configuration directory that you want to edit or review.
double-click and step inside the directory that you want to use, not just select it
- Edit all the components of your vehicle to match your own in the Vehicle Component Editor window.
- Press Save data and start configuration.
- The application will validate your input.
If issues are found the problematic fields’ background will be marked in red color.
Correct those entries and press the
Save data and start configurationbutton again. - You should now see the Parameter file editor and uploader window.
theUpload selected params to FC, and advance to next param filebutton will be grayed out because there is no FC connected. - Follow the procedure to configure the vehicle parameters
If something is not clear, read the ArduPilot Methodic Configurator user manual
Use the correct default values
To get the correct default values for your board (if it does not support MAVFTP) you need to do:
cd VehicleConfigurarationDirectory
extract_param_defaults bin_log_file.bin > 00_default.param
Re-run the procedure after changing a vehicle component
- Connect the flight controller to the computer using a USB cable.
- Wait at least 7 seconds.
- Open the ArduPilot Methodic Configurator software.
- The software should now automatically detect and connect to your flight controller.
- Open the vehicle configuration directory that you want to edit or review.
double-click and step inside the directory that you want to use, not just select it
- Edit all the components of your vehicle to match the component and/or connections changes you made in the Vehicle Component Editor window.
- Press Save data and start configuration.
- The application will validate your input.
If issues are found the problematic fields’ background will be marked in red color.
Correct those entries and press the
Save data and start configurationbutton again. - You should now see the Parameter file editor and uploader window.
- Now depending of the changes you made you will need to re-do some steps and can skip some others:
- FC changed - Need to redo all steps
- Frame and/or Take-off-weight - redo steps 19 and above
- RC Controller - redo step 05 and the RC parts of step 12
- RC Transmitter - Redo step 05 and the RC parts of step 12
- RC Receiver - redo step 05 and the RC parts of step 12
- Telemetry - redo step 06
- Battery Monitor - redo step 08
- Battery - redo step 08 and 19 and above if the weight changed
- ESC - redo step 07 and 19 and above
- motors - redo step 07 and 19 and above
- props - redo step 07, and 11 and above
- GNSS receiver - redo step 10
- Follow the procedure to configure the vehicle parameters
If something is not clear, read the ArduPilot Methodic Configurator user manual